Building and Configuring a Phishing Server on a VPS locally
This Blog details the practical aspect of setting up a SMTP server with a MTA ( Ex: gophish, MS Exchange Server etc), configuring a MUA dekstop client for remote access to SMTP and setup Security Related Checks such as SPF,DKIM,DMARC to bypass modern MTA spam filters from scratch.
For this blog I’ve used the following and would recommend something similar
Ubuntu 20.04LTSas my distro.Gmailas the testing external MTA spam filter & mail service.Namecheapas my domain hosting provider. Buy used/lapsed domains as I’ve noticed domain age is a key factory regardingly deliverability (Age the domain atleast 6weeks+).Thunderbirdas my MUA remote desktop client for remote access to the smtp server.GoPhish/MS Exchangeas my local MTA server for phishing.- Disable any firewall rules against ports:
25,587,80,443,465,143,993,110,995.
Index
I will be breaking this build into 3 broad stages. We will be comparing the spam score at the end of each stage to see the overall processs of improvement in deliverability.
STAGE 1
Setting up a Message Transport System (MTS) aka SMTP server (Postfix)
Postfix is a light , easy to use MTS which serves 2 primary purposes:
- Transporting email messages from a mail client/mail user agent (MUA) to a remote SMTP server.
- Accepts emails from other SMTP servers.
We will configure postfix for a single domain in this tutorial.
Set Hostname and DNS records
Postfix uses the server’s hostname to identify itself when communicating with other MTAs. A hostname could be a single word or a FQDN.
Note: We will use
example.comas our registered example domain here.
Make sure your hostnames set to a FQDN such as mail.example.com by using the command: sudo hostnamectl set-hostname mail.example.com
Gracefully reboot your server using init 6 after.
Set up DNS records:
- MX records tell other MTA’s that your mail server mail.example.com is responsible for email delivery for your domain name.
MX record @ mail.example.com
- An A record maps your FQDN to your IP address.
mail.example.com <ip-addr>
Permanently disable ipv6 and uninstall unecessary services like exim
Ipv6 is tricky to configure alongside ipv4 and just adds a weighted overhead. For instance, you’d have to create a seperate reverse DNS entries for both ipv6 along with ipv4 or else MTA’s such as gmail mail servers are bound to reject you.
To permanently disable ipv6 follow these steps (works on ubuntu20.04LTS and family):
- Edit the /etc/sysctl.conf configuration file by adding the following lines:
vi /etc/sysctl.confnet.ipv6.conf.all.disable_ipv6=1 net.ipv6.conf.default.disable_ipv6=1 - This works on ubuntu 20.04, If it dosen’t find an equivalent to disable ipv6 for your specific distro.
- A recommened method would be using
grubtoo. Check this article for more details.
Also exim or any other mail services that come by default packaged with some distributions like debian 8 hinder the installation of another mail service. So uninstall any unwanted mail service of the kind if they exist on your distro prepackaged.
PTR record
Your PTR record does the inverse, that is maps your IP address back to your FQDN. This is as crucial as it gets as MTA’s like gmail and most out there will only accept mails through into the primary inbox if this is set right.
This could be an option your hosting provider allows you to setup like how you did your domain records (cockbox.org uses this method ) or you’d have to probably contact support and they’d do it for you (flokinet works this way). Either case find a hosting provider that supports this.
Installing Postfix
Install postfix:
  sudo apt-get update

  sudo apt-get install postfix -y
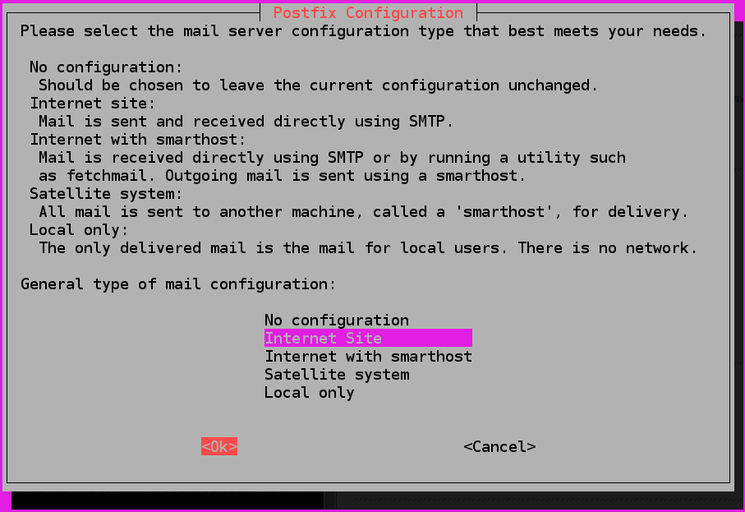
- While installation you will be asked to select a type for mail configuration. Select
Internet Site.- This option allows Postfix to send emails to other MTAs and receive emails from other MTAs.
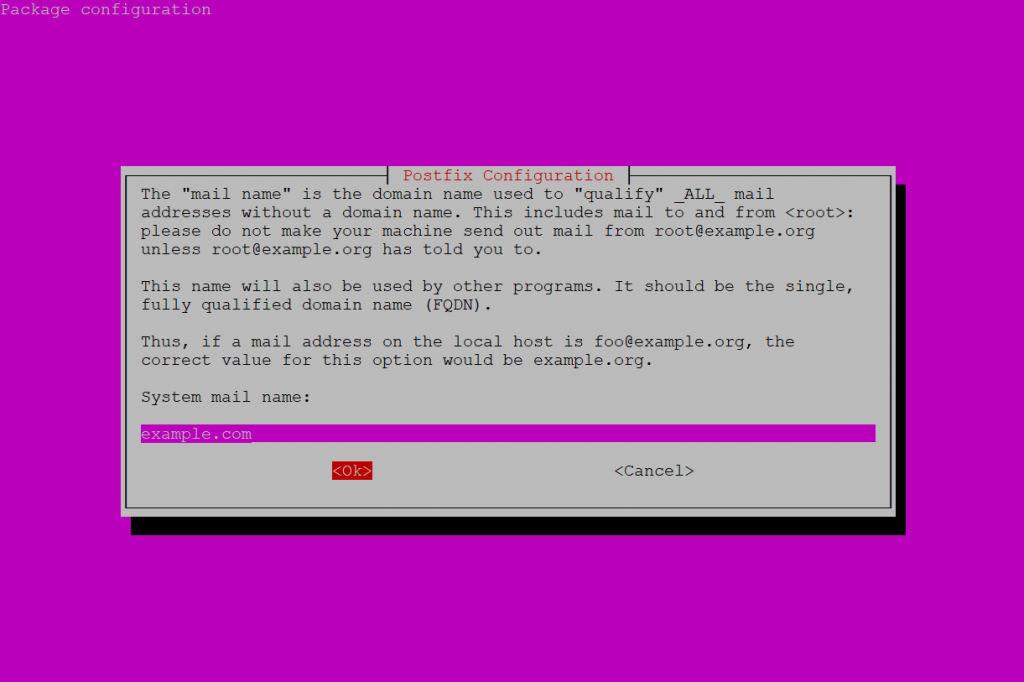
- Next enter your domain name when prompted for the system mail (not the
mail.example.comsubdomain) that is “example.com”. - This ensures that your mail address naming convention would be in the form of:
[-] name@example.comand not,[x] name@mail.example.com.
Once installation is complete a /etc/postfix/main.cf config file would be automatically generated along with postfix starting up.
- Check your current Postfix version using the command:
postconf mail_version.

- Use ‘Socket Statistics’ -
ssutility to check if postfix is running on port 25 succesfully:sudo ss -lnpt | grep master

- If you’d like to view the various binaries shipped along with postfix check them out with
dpkg -L postfix | grep /usr/sbin/.
Sendmail is a binary placed at /usr/sbin/sendmail which is compatible with postfix to send emails. Send out your first testmail to your test email account using: echo "test email" | sendmail your-test-account@gmail.com
- Or you could install
mailutilsusingsudo apt-get install mailutils. Just type “mail” and follow along the prompts entering the required fields and hittingCtrl+Donce done to send the mail.
Note: The email might land through into your primary right away but could be potentially flagged by other stronger MTA’s and their spam filters.
Incase your hosting provider has blocked outbound port 25, verify it using: telnet gmail-SMTP-in.l.google.com 25
- If you see a status showing
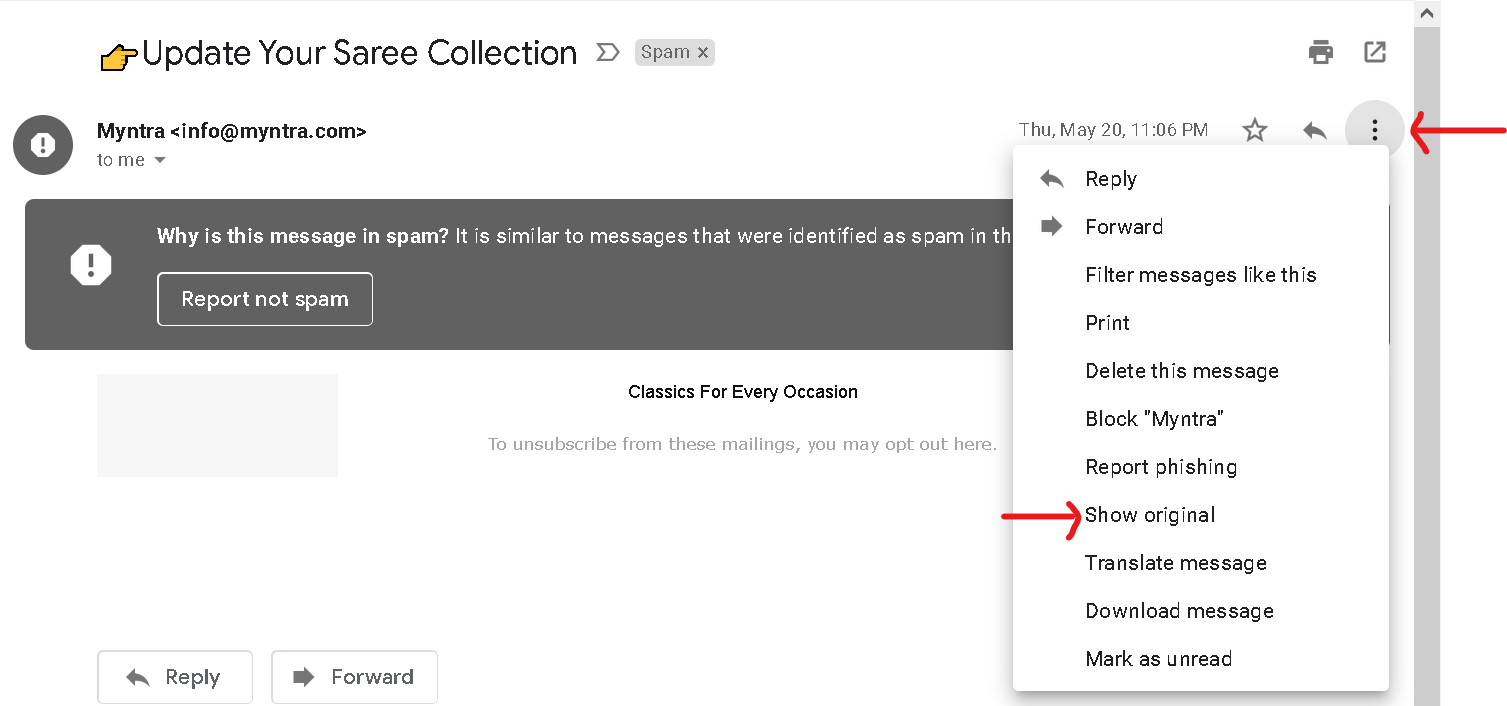
Connected --> outbound 25 works succesfully. Usequitto quit the command. - Head on over to your gmail inbox and open up the mail.
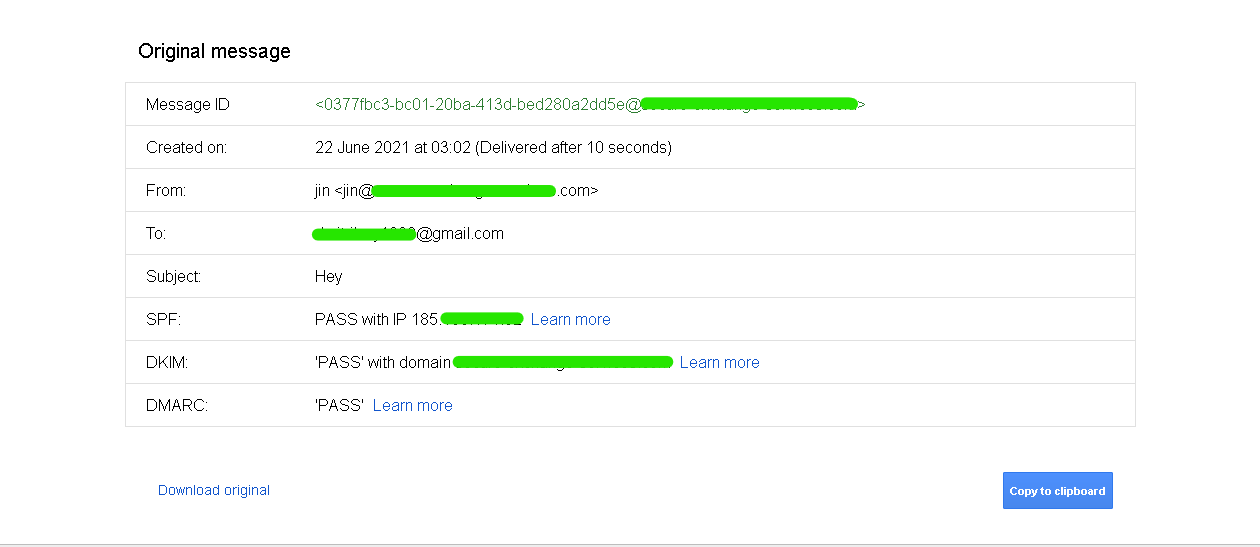
- Click on the drop down below the “Printer icon” to the right as shown in the
screenshot --> next click on "show original". --> next click on the "Copy to clipboard" buttonto copy all contents.
- Head on over to https://spamcheck.postmarkapp.com/ and paste your contents in and check your
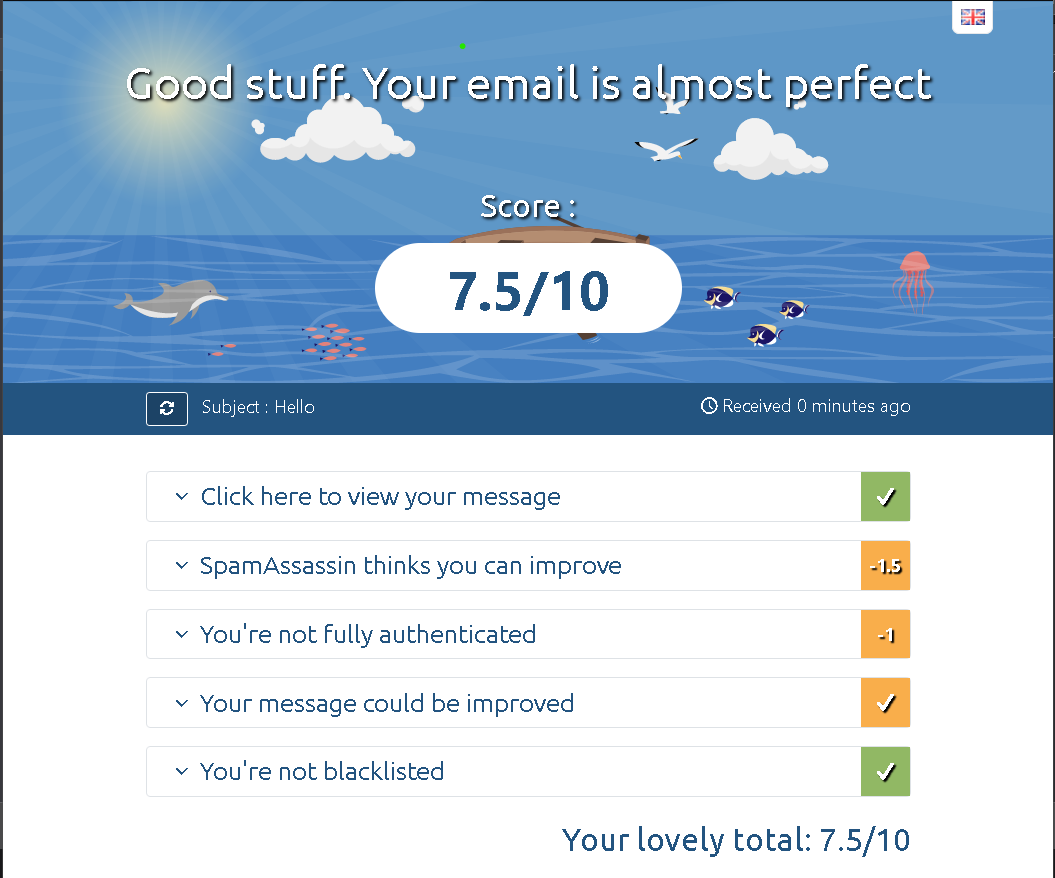
SpamAssasinspam score. - Check your deliverablity using mail tester. My score here was about
5.5here at the moment
STAGE 2
Install an IMAP SERVER (Dovecot), enable TLS encryption and setup a Desktop client
Getting TLS encryption and a certificate the easy way
TLS encryption is mandatory and ensures secured delivery. LetsEncrypt offers a free certificate with assisstance from their client: certbot.
Head on over to https://certbot.eff.org/. Click on “Get Certbot instructions”.
Select your server as the Software and which distro your running on system. In my case as i said before im using apache2 and ubuntu20.04LTS.
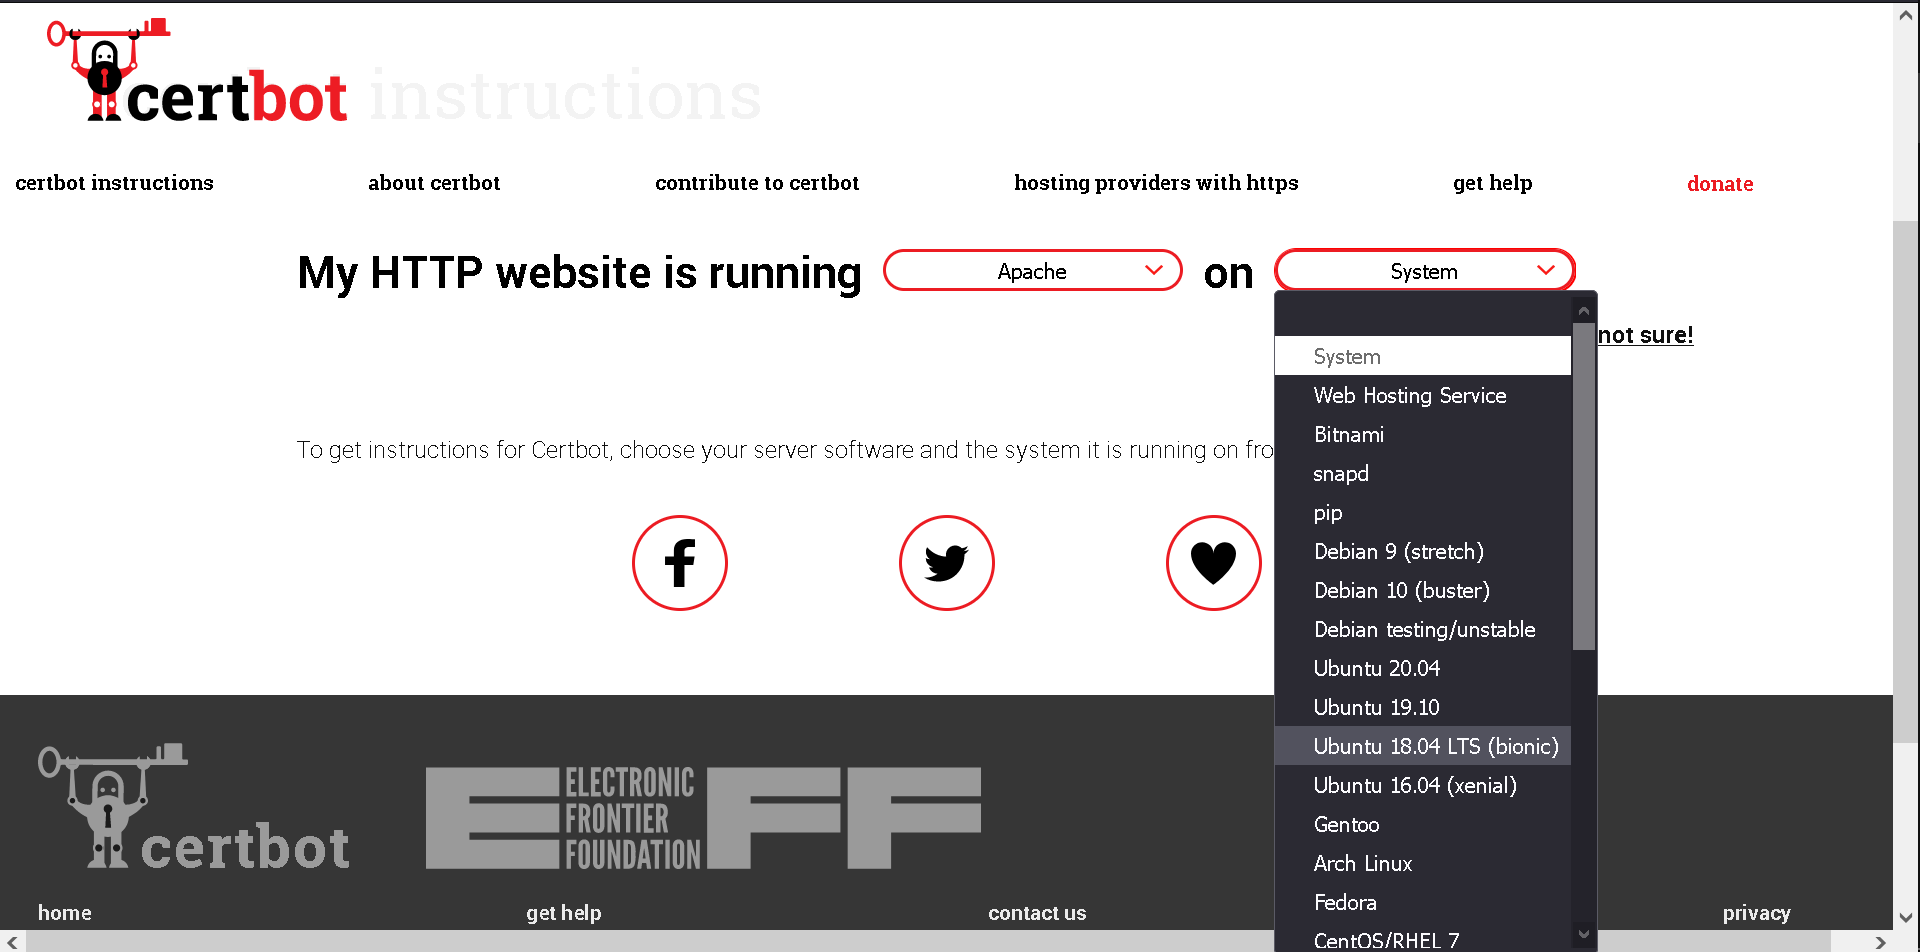
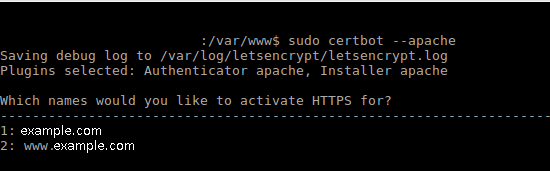
Follow along the instructions to succesfully install certbot and when you reach an instruction such as sudo certbot --apache you will be prompted for the domains and subdomains to enable TLS on along with an administrative mail contact. Fill them as your hosting needs.
You will then find your certificates in /etc/letsencrypt/live/example.com/.
Note: Use fullchain.pem as the supplied certificate and privkey.pem as the key . Fullchain.pem is a concatenation of cert.pem and chain.pem in one file.
All your TLS certificates will now be live and the config automatically replaced in your respective web servers config. Renew or set a cronjob to renew your certificates periodically as listed by certbot.
Enable Submission Service in Postfix
To send emails from a remote desktop email client, we need to enable the submission service of Postfix so that the email client can submit emails to Postfix SMTP server.
- Edit the
master.cffile using your favorite text editor as follows:sudo vi /etc/postfix/master.cf - In the submission section, uncomment the
submission...line and append the following lines(the 2nd line from the start) as stated here below it. This method ensures no bad tabs/spaces causing the config to error out. (Be careful with the indentation)submission inet n - y - - SMTPd -o syslog_name=postfix/submission -o SMTPd_tls_security_level=encrypt -o SMTPd_tls_wrappermode=no -o SMTPd_sasl_auth_enable=yes -o SMTPd_relay_restrictions=permit_sasl_authenticated,reject -o SMTPd_recipient_restrictions=permit_mynetworks,permit_sasl_authenticated,reject -o SMTPd_sasl_type=dovecot -o SMTPd_sasl_path=private/auth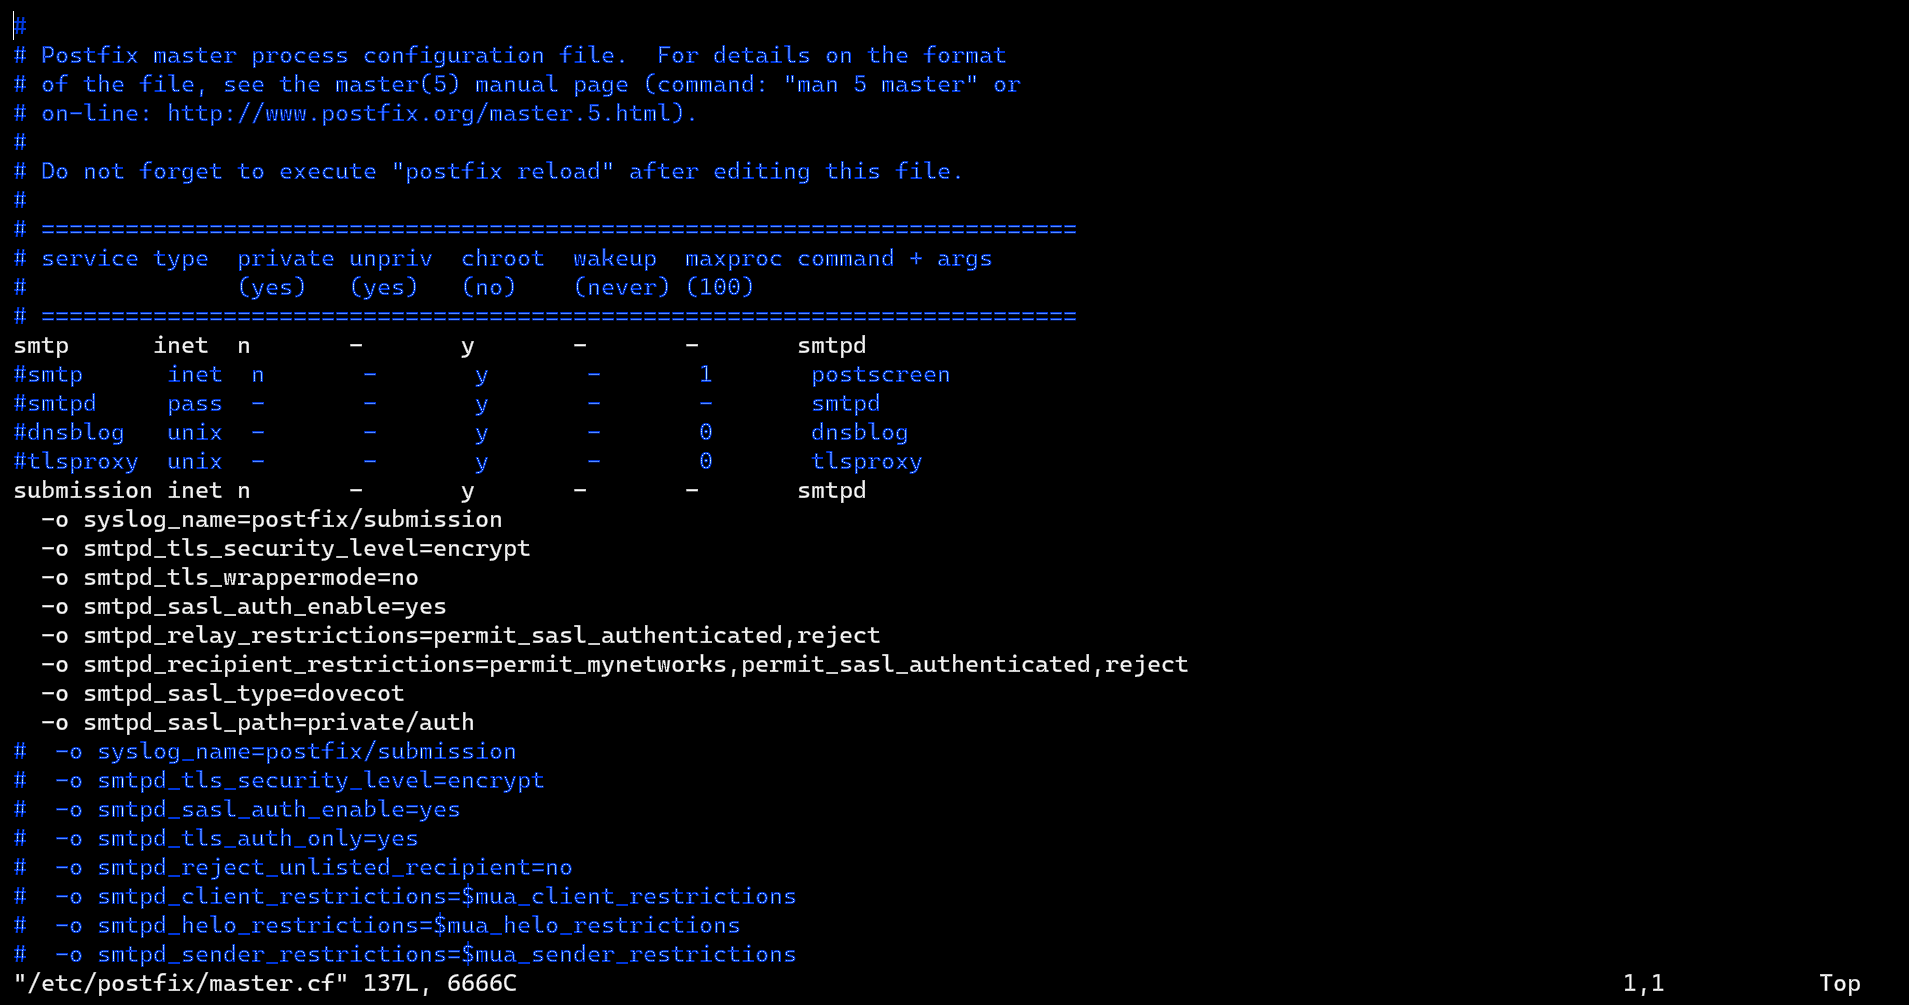
- This configuration enables the submission daemon of Postfix and requires TLS encryption so that we can later connect using a desktop client. This listens on port 587 by default.
- To use Microsoft Outlook as a desktop client listening over port 465. Then you need to do the same and enable the submission daemon over
port 465. - Uncomment the
SMTPs..line as before and paste the follows below it:SMTPs inet n - y - - SMTPd -o syslog_name=postfix/SMTPs -o SMTPd_tls_wrappermode=yes -o SMTPd_sasl_auth_enable=yes -o SMTPd_relay_restrictions=permit_sasl_authenticated,reject -o SMTPd_recipient_restrictions=permit_mynetworks,permit_sasl_authenticated,reject -o SMTPd_sasl_type=dovecot -o SMTPd_sasl_path=private/auth- Save and close the file.
- Next, we need to specify the location of the previously before generated TLS certificate and private key in the Postfix config file. To do this we need to edit the
main.cfconf file:sudo vi /etc/postfix/main.cf - Delete/Comment-out any previous TLS parameters and edit the TLS parameters as follows.
- Add the TLS param code block from before and replace
SMTPd_tls_cert_filewith the full path to yourfullchain.pem. Or just replaceexample.comwith your domain name if you’re using Ubuntu like me.#Enable TLS Encryption when Postfix receives incoming emails SMTPd_tls_cert_file=/etc/letsencrypt/live/example.com/fullchain.pem SMTPd_tls_key_file=/etc/letsencrypt/live/example.com/privkey.pem SMTPd_tls_security_level=may SMTPd_tls_loglevel = 1 SMTPd_tls_session_cache_database = btree:${data_directory}/SMTPd_scache #Enable TLS Encryption when Postfix sends outgoing emails SMTP_tls_security_level = may SMTP_tls_loglevel = 1 SMTP_tls_session_cache_database = btree:${data_directory}/SMTP_scache #Enforce TLSv1.3 or TLSv1.2 SMTPd_tls_mandatory_protocols = !SSLv2, !SSLv3, !TLSv1, !TLSv1.1 SMTPd_tls_protocols = !SSLv2, !SSLv3, !TLSv1, !TLSv1.1 SMTP_tls_mandatory_protocols = !SSLv2, !SSLv3, !TLSv1, !TLSv1.1 SMTP_tls_protocols = !SSLv2, !SSLv3, !TLSv1, !TLSv1.1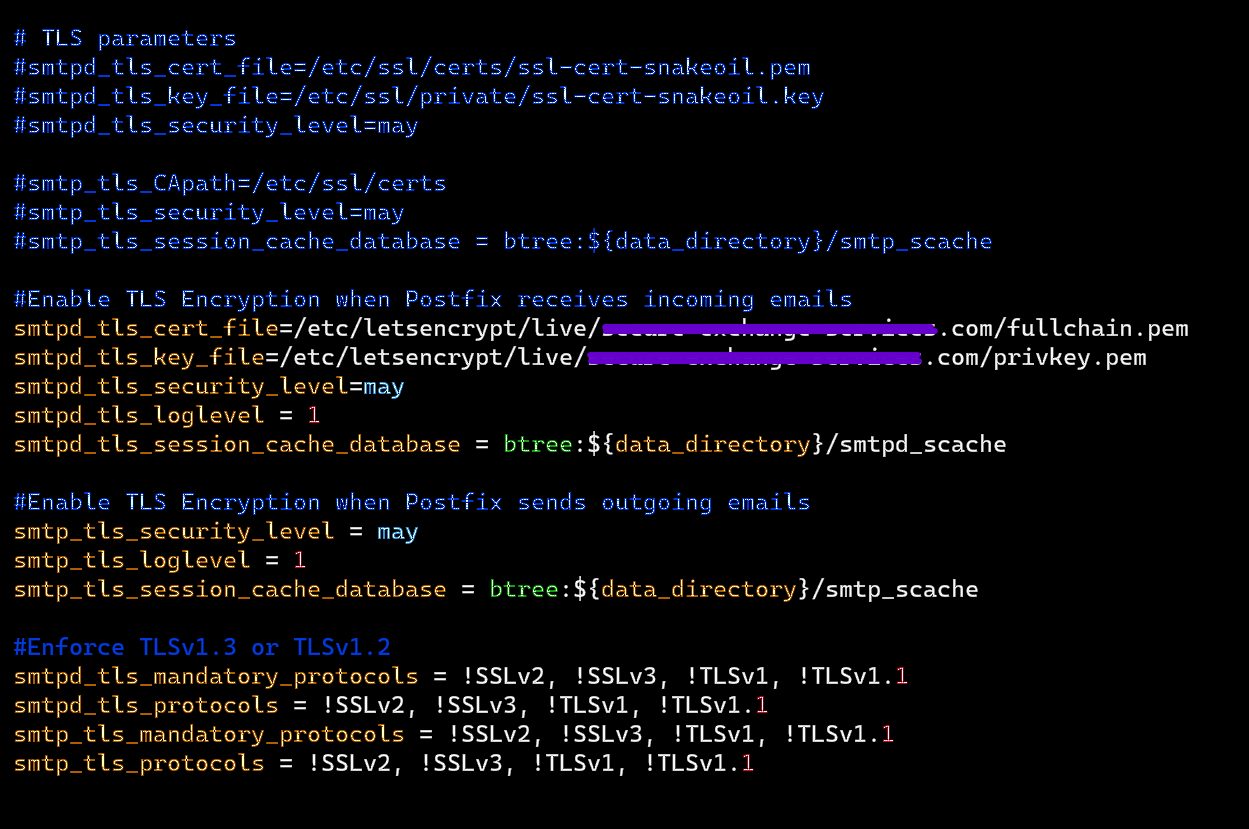
- Save and close the file.
- Now restart Postfix.
- Now run the following command to verify if Postfix is listening on
port 587(port 465if you’ve configured outlook too).sudo systemctl restart postfix sudo ss -lnpt | grep master
Installing and Configuring the IMAP Server: Dovecot
Enter the following command to install Dovecot’s core packages and the IMAP daemon package on your server: sudo apt install dovecot-core dovecot-imapd
To setup POP3 to fetch emails, install the dovecot-pop3d package as: sudo apt install dovecot-pop3d
Check the version of Dovecot: dovecot --version
Enabling IMAP/POP3/LMTP Protocol
You can enable and use any protocol depending on your setup and the way you’d like to recieve and manage the mail system. Enabling atleast one is mandatory.
- IMAP/POP3:
- Edit the main dovecot config file using:
sudo vi /etc/dovecot/dovecot.conf - Add/append the following line to enable both the IMAP and POP3 protocol:
protocols = imap pop3

- Edit the main dovecot config file using:
Configuring the Mailbox Location:
By default, Postfix and Dovecot use the “mbox format” to store emails. By default each user’s emails are stored in a single file in /var/mail/username. To change it to use the “Maildir format” where email messages will be stored under the Maildir directory under each respective user’s home directory for easy management follow along: sudo vi /etc/dovecot/conf.d/10-mail.conf
- Find and change the
mail_locationto the value as follows:mail_location = maildir:~/Maildir - Also append the following line to the file. If you’re on Ubuntu 18.04+ this line is automatically added so you dont have to enter it:
mail_privileged_group = mail - Save and close the file.
- Now create/add dovecot to the mail group so that Dovecot can read the INBOX using:
sudo adduser dovecot mail
Although we configured Dovecot to store emails in the “Maildir format”, by default Postfix uses its built-in local delivery agent (LDA) to move inbound emails to the message store and it will be saved in the “mbox format”.
To avoid this we also configure Postfix to pass incoming emails to Dovecot using the LMTP protocol. This is a simplified version of SMTP where incoming emails will be saved in the required “Maildir format” we’ve setup to use.
Now install the Dovecot LMTP server as before using : sudo apt install dovecot-lmtpd
Lets Edit the Dovecot main configuration file to set this up: sudo vi /etc/dovecot/dovecot.conf
- Add
lmtpto the supported protocols as before (I’ve set all to run in this example.):protocols = imap pop3 lmtp

- Save and close the file.
- Its now time to edit the
Dovecot 10-master.conffile:sudo vi /etc/dovecot/conf.d/10-master.conf - Find and replace/comment out the
lmtpservice definition to the following:service lmtp { unix_listener /var/spool/postfix/private/dovecot-lmtp { mode = 0600 user = postfix group = postfix } }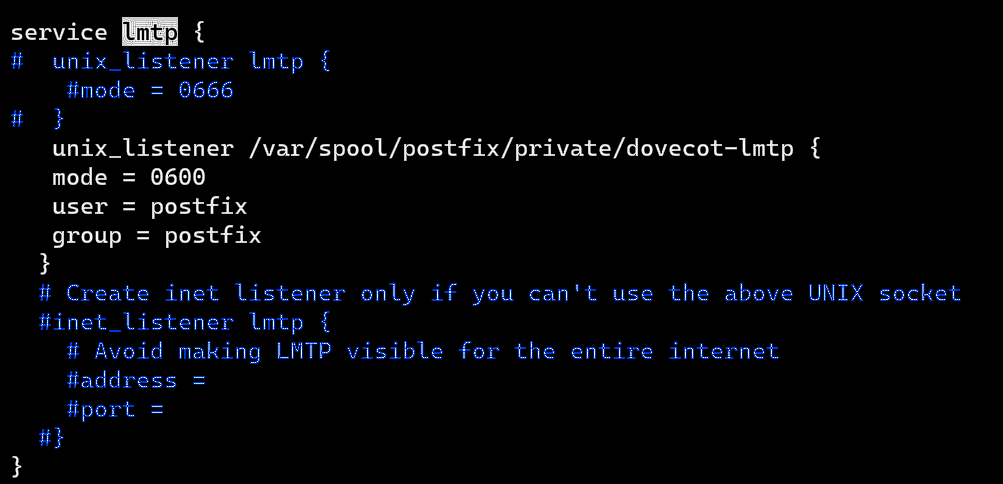
- Now, edit the Postfix main configuration file:
sudo vi /etc/postfix/main.cf - Append the following lines to the end of the file to deliver incoming emails to the local message store via the Dovecot LMTP server and disable
SMTPUTF8.mailbox_transport = lmtp:unix:private/dovecot-lmtp SMTPutf8_enable = no - Save and close the file.
Configuring the Authentication Mechanism
Lets start by editing the authentication config file: sudo vi /etc/dovecot/conf.d/10-auth.conf
Uncomment/add the following lines:
disable_plaintext_auth = yes
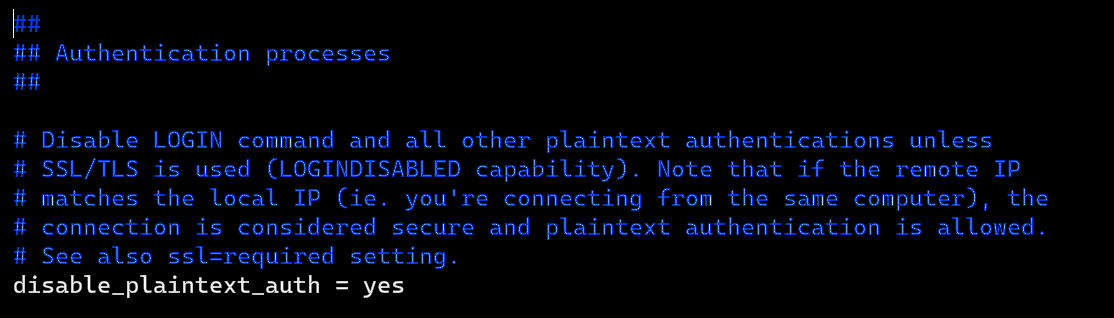
- This will disable plaintext authentication when there’s no SSL/TLS encryption for added security and no fallback to vulnerable versions.
#auth_username_format = %Luand change its value to –>auth_username_format = %n.
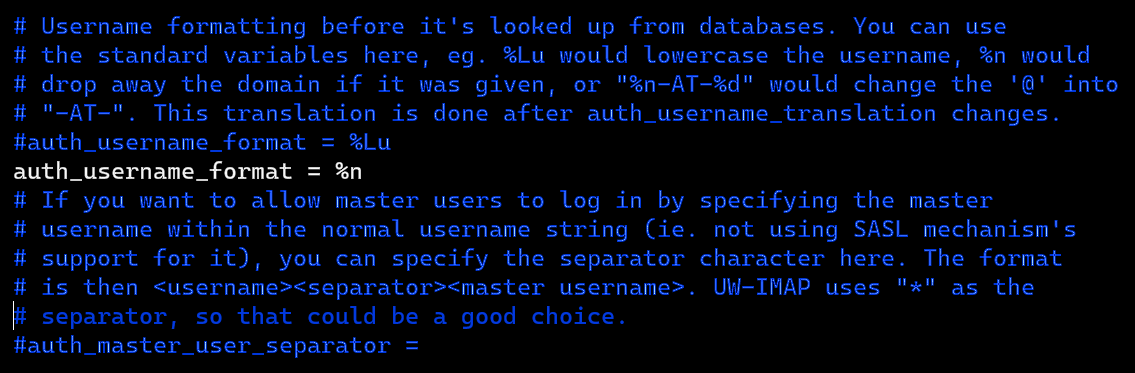
- This is required as we setup canonical mailbox users.
auth_mechanisms = plainand change its value to –>auth_mechanisms = plain login
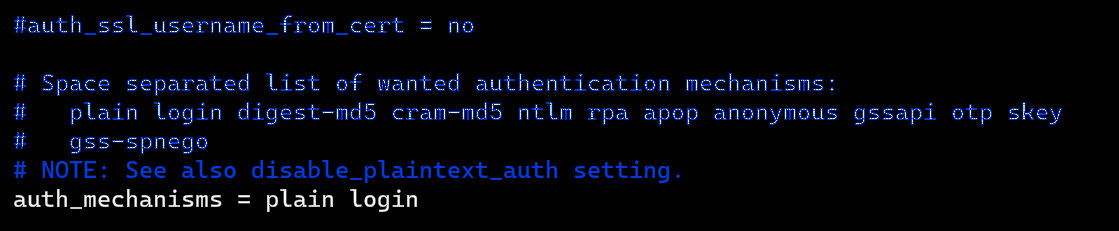
- This only enables the PLAIN authentication mechanism.
Configuring SSL/TLS Encryption:
- Edit the SSL/TLS config file as follows:
sudo vi /etc/dovecot/conf.d/10-ssl.conf - Find and change the value of
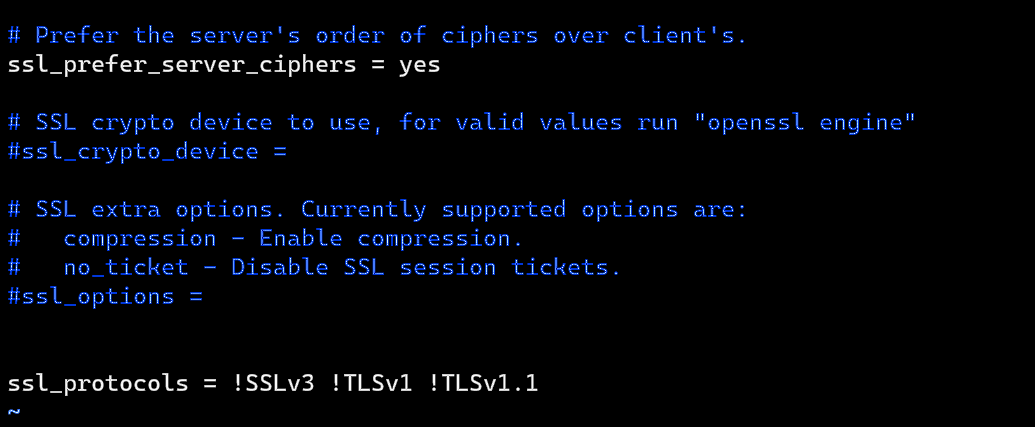
ssl = yestossl = required - Find and change the value of
#ssl_prefer_server_ciphers = notossl_prefer_server_ciphers = yes - Disable outdated and inscure SSLv3, TLSv1 and TLSv1.1 by adding the following line to the end of the file:
ssl_protocols = !SSLv3 !TLSv1 !TLSv1.1 - Next find the following lines:
ssl_cert = </etc/dovecot/private/dovecot.pem ssl_key = </etc/dovecot/private/dovecot.key - Replace them with the perviously generated location of your Let’s Encrypt TLS certificate and private key.
- It would be as follows:
ssl_cert = </etc/letsencrypt/live/example.com/fullchain.pem
ssl_key = </etc/letsencrypt/live/example.com/privkey.pem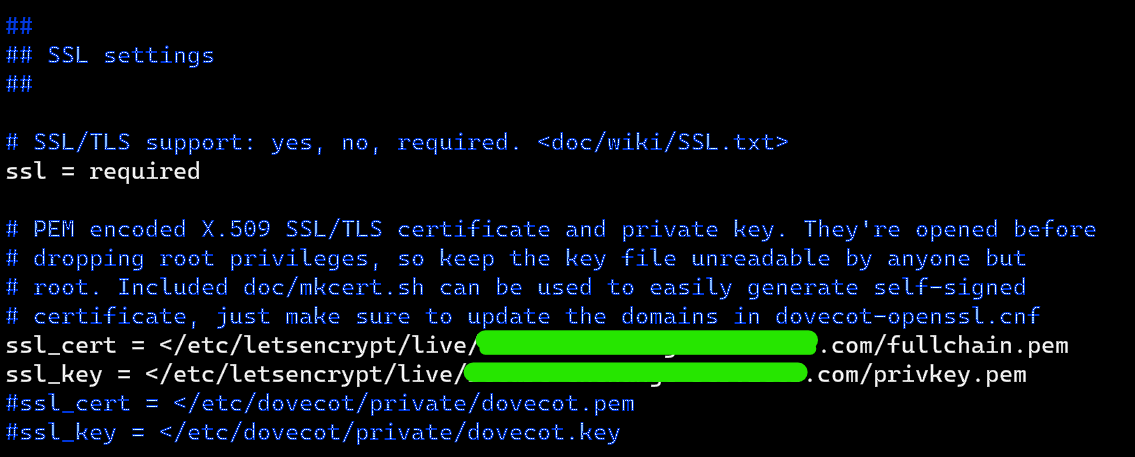
Setting up SASL Authentication
- Edit the
10-master.conffile as before:sudo vi /etc/dovecot/conf.d/10-master.conf - Change
service authsection to the following so that Postfix can find the appropriate Dovecot authentication server.service auth { unix_listener /var/spool/postfix/private/auth { mode = 0660 user = postfix group = postfix } }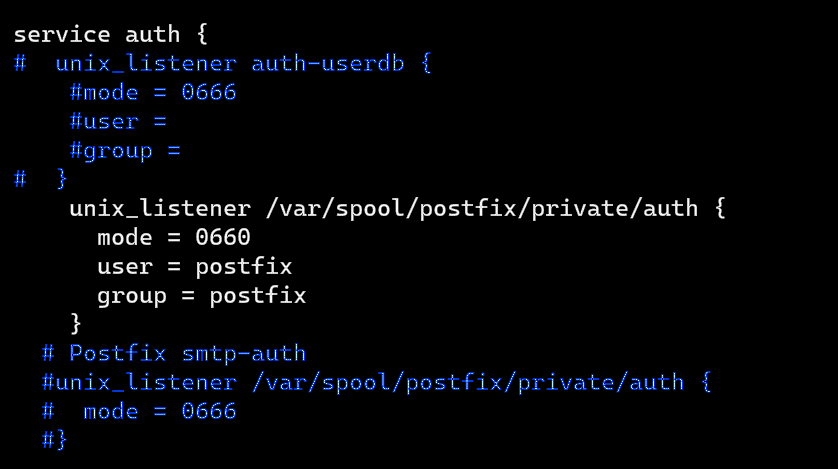
- Save and close the file.
Auto-create Sent and Trash Folder:
- Edit the following config file:
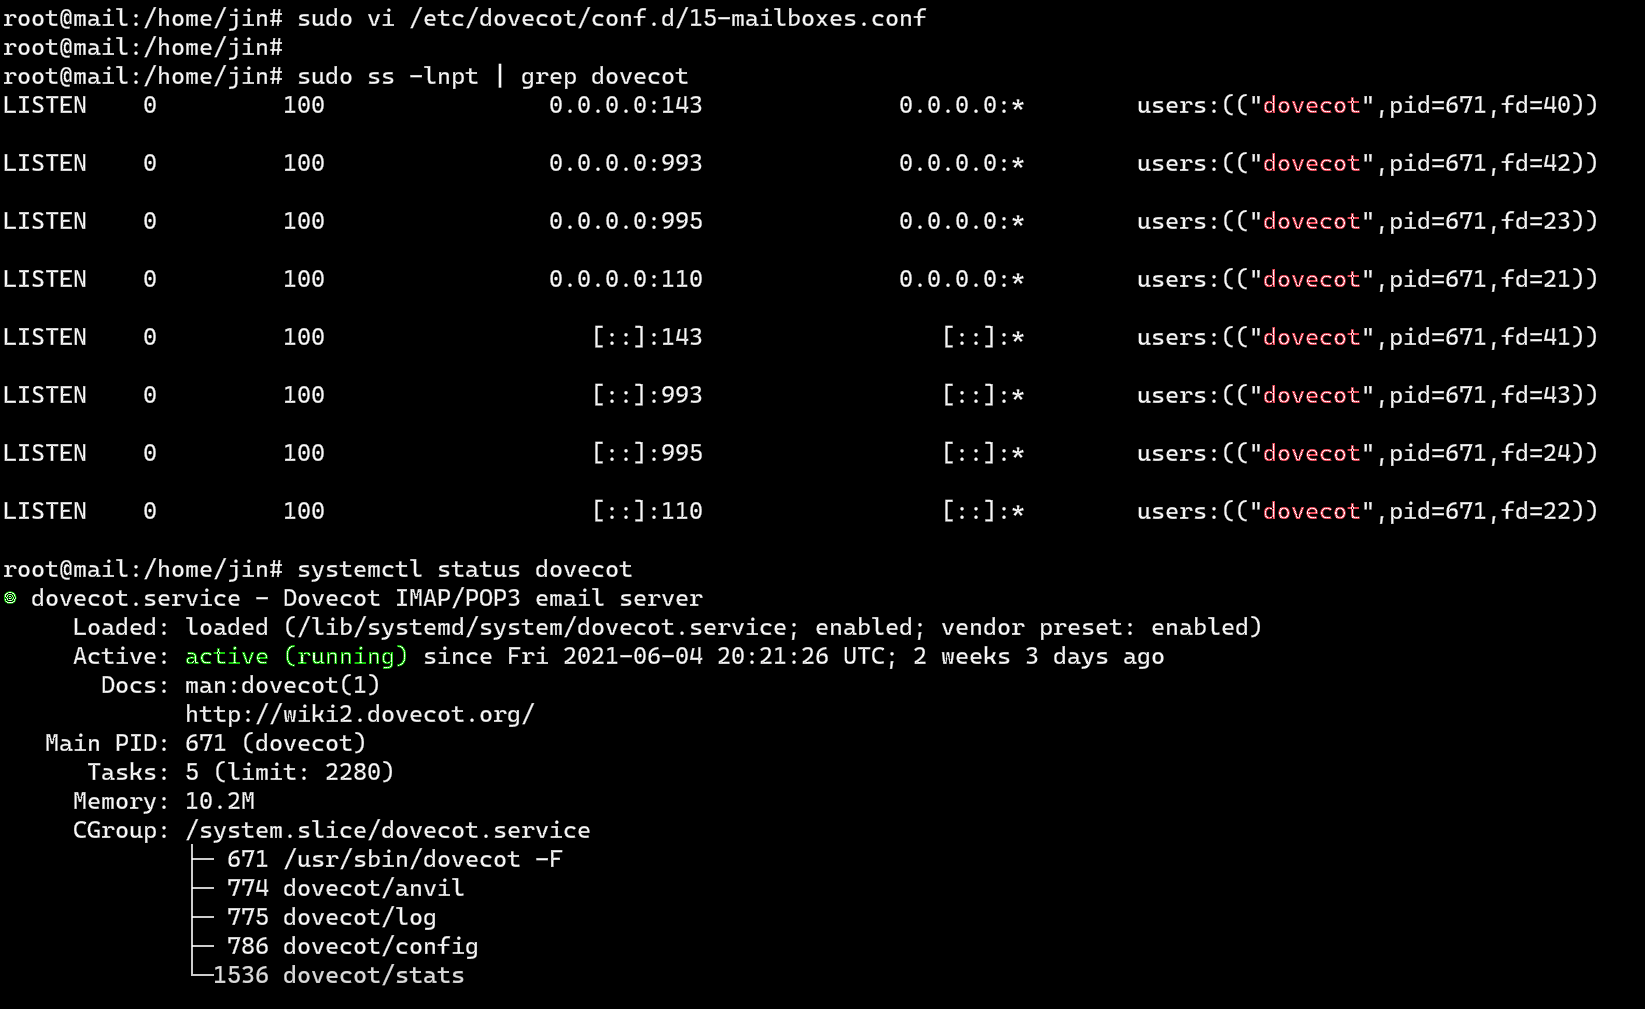
sudo vi /etc/dovecot/conf.d/15-mailboxes.conf - Now to “auto-create” a specific section just append the following inside each respective code block:
auto = create- Example: To auto-create the Trash folder in your client–>
mailbox Trash { auto = create special_use = \Trash } - By default its good practice to enable common folders such as - “Drafts, Junk, Sent, Trash” for better usage and tracking of the mails sent and recieved.
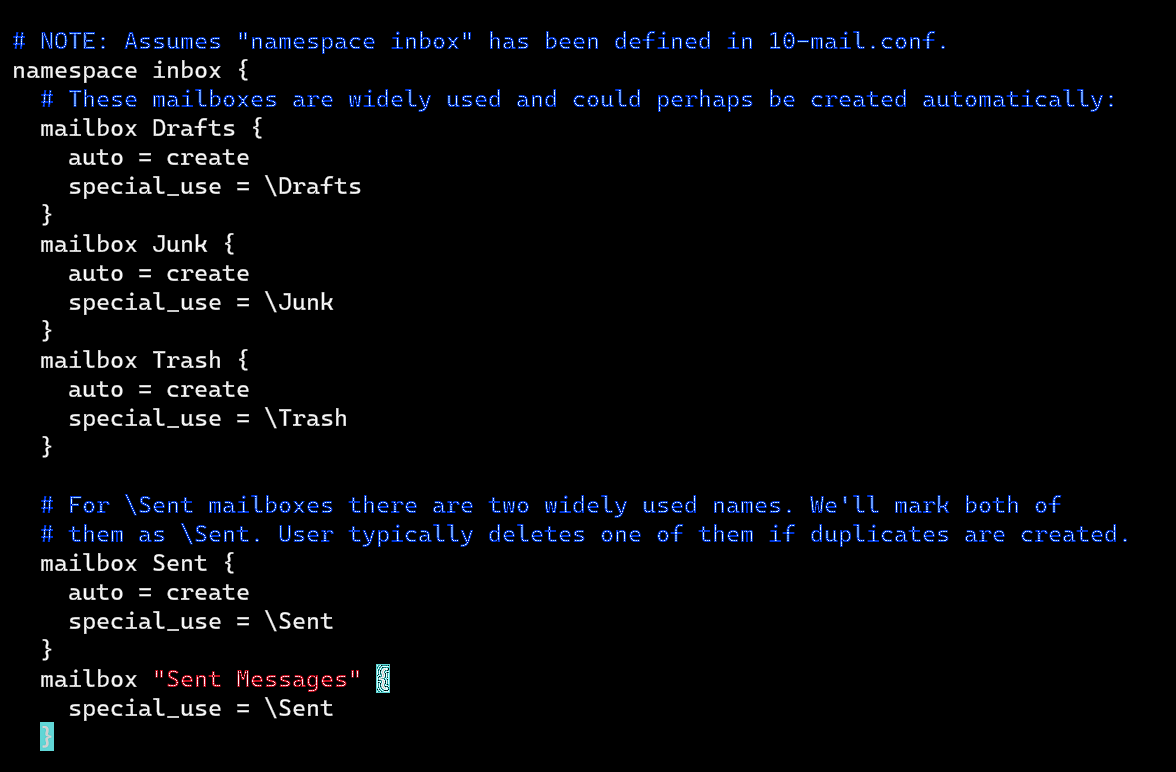
- Example: To auto-create the Trash folder in your client–>
- Save the file and restart Postfix and Dovecot:
sudo systemctl restart postfix dovecot
Dovecot will be listening on port 143 (IMAP) and 993 (IMAPS) .
sudo ss -lnpt | grep dovecot
systemctl status dovecot
Setting up the Desktop Email Client for Remote access
I’ve setup Thunderbird as my Desktop client and would recommend something similar.
Install it using :
- On windows : Go here
- On NIX:
sudo apt install thunderbird
Run Thunderbird:
- You’d most likely see a popup stating to setup your mail account if not go to
Edit -> Account Settings -> Account Actions -> Add Mail Accountto add a mail account. - Click on Configure manually and setup as shown.
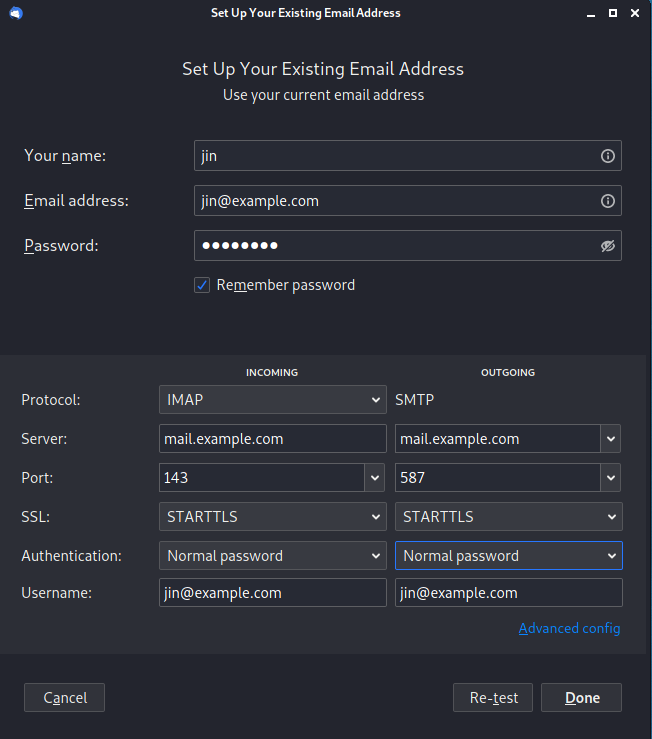
- Select the
IMAPprotocol; Entermail.example.comas the server name; Choose port143andSTARTTLSencryption; Choosenormal passwordas the authentication method.
Note: You can also use port 993 with SSL/TLS encryption for IMAP, and use port 465 with SSL/TLS encryption for SMTP if you’ve set this up with Microsoft Outlook.
You will now be able to connect to your setup mail server and finally send and receive emails with any external desktop email client using your mail server as a secure encrypted relay. Send a test mail and enter your credentials to ensure your setups up and working fine.
You can now also Create various Users on your VPS mail sevrer and create various associated mail accounts for sending/recieving capability: sudo adduser -m support
You can list all available mailbox users with: sudo doveadm user '*'
It’s advisable to restart Dovecot each time you add users.
And STAGE 2 is complete. Let’s check our spam score.
TroubleShooting tips:
- If you get a Relay access denied error it’s most likely that our VPS hosting provider dosen’t allow relay over these ports. To find a Hosting provider that supports all such needs check out my writeup on it
- If you use the Cloudflare DNS service, you should not enable the CDN (proxy) feature when creating DNS an A record and an AAAA record for the hostname of your mail server as Cloudflare dosen’t support SMTP or IMAP proxy.
Stage 3
Setting up SPF and DKIM with Postfix
We finally have a working Postfix SMTP server and Dovecot IMAP server with which we can send and receive email using any external remote email client like a desktop client(thunderbird). Although we have correctly set up our DNS MX, A and PTR records our emails are still flagged as spam by strong and popular email services such as Gmail and Outlook mail.
As we all know most of our targets would be using such mail services so to succesfully bypass most strong spam filters its mandatory to set up a SPF and DKIM record as explained before.
And we begin,
Setting and configuring SPF
- Get back to your respective domain management interface for DNS and create a new TXT record as follows:
TXT @ v=spf1 mx ~all
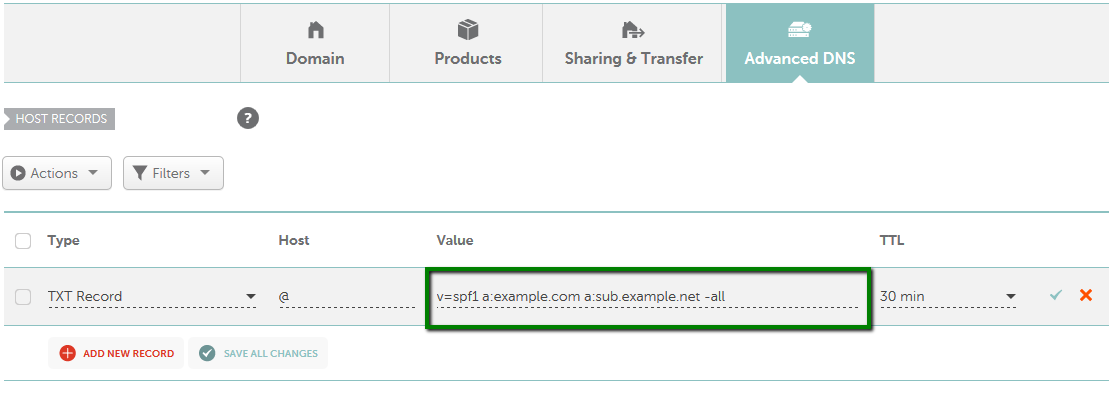
v=spf1: indicates that this is an SPF record and the SPF record version we are using is SPF1.
mx: means all hosts listed in the MX records are allowed to send emails for your domain and any other hosts are disallowed.
~all: indicates that emails from your domain should only come from hosts specified in the SPF record.
- Use the following command to verify you’ve succesfully added the record:
dig example.com txt +short

Configuring SPF Policy Agent:
We now need to tell Postfix to check for SPF records of incoming emails. This doesn’t help ensure outgoing email delivery but helps with detecting forged incoming emails.
- Install the required packages:
sudo apt install postfix-policyd-spf-python - Next, edit the Postfix master process configuration file:
sudo vi /etc/postfix/master.cf - Now append the following to the end of the file:
policyd-spf  unix  -       n       n       -       0       spawn
    user=policyd-spf argv=/usr/bin/policyd-spf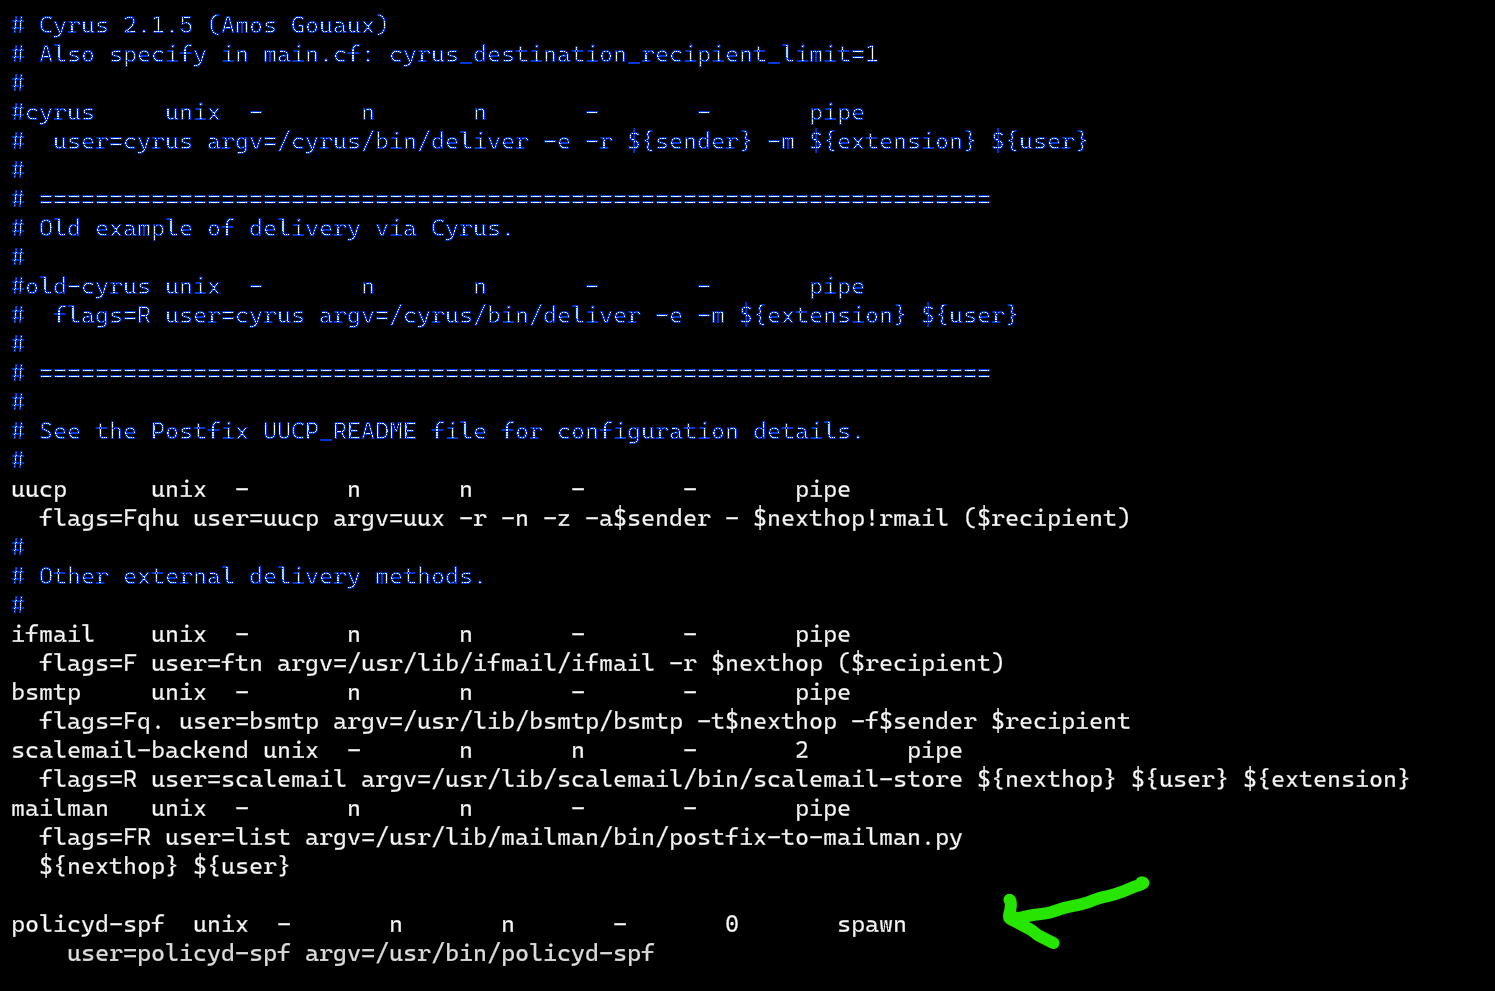
- Save and close the file. Next, edit the Postfix main configuration file:
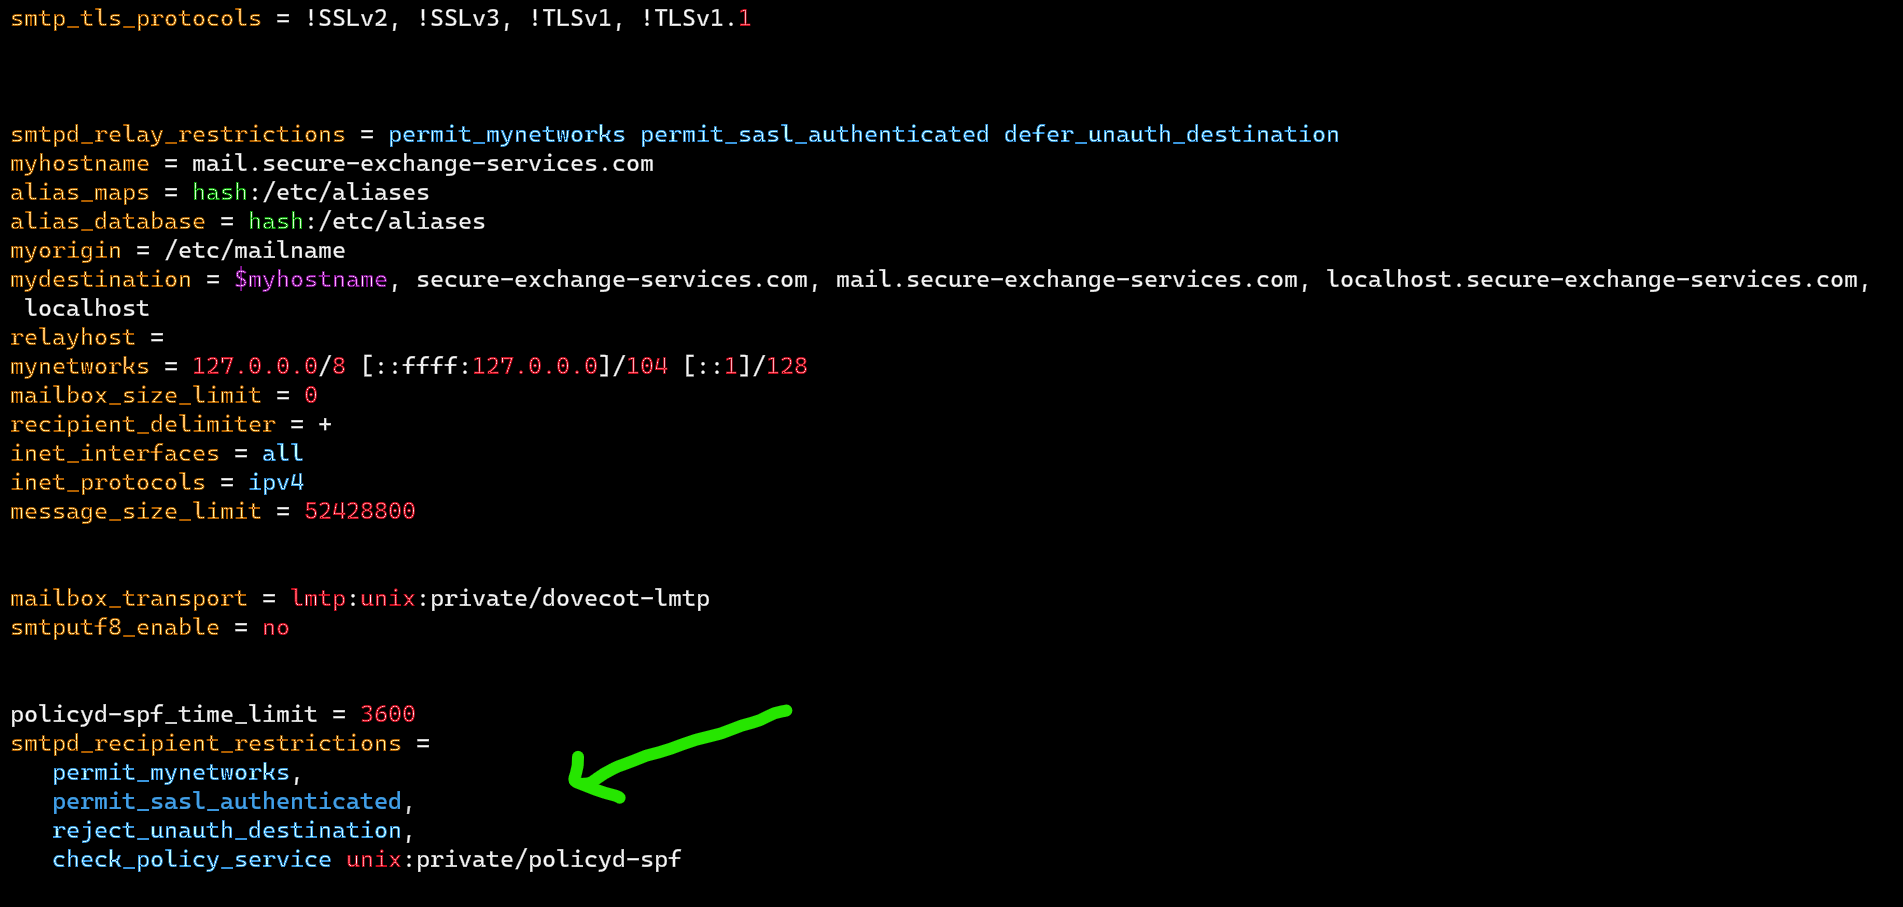
sudo vi /etc/postfix/main.cf - Append the following lines at the end of the file as before:
policyd-spf_time_limit = 3600 SMTPd_recipient_restrictions = permit_mynetworks, permit_sasl_authenticated, reject_unauth_destination, check_policy_service unix:private/policyd-spf - This will impose a restriction on incoming emails by rejecting unauthorized email and checking SPF record.
- Save and close the file and restart Postfix:
sudo systemctl restart postfix
When you receive an email from a domain that has an SPF record the next time, you can see the SPF check results in the raw email header. It would be as follows: Received-SPF: Pass (sender SPF authorized).
Setting up DKIM
- Install OpenDKIM which is an open-source implementation of the DKIM sender authentication system using:
sudo apt install opendkim opendkim-tools - Next add postfix user to the opendkim group:
sudo gpasswd -a postfix opendkim - Edit the OpenDKIM main configuration file as follows:
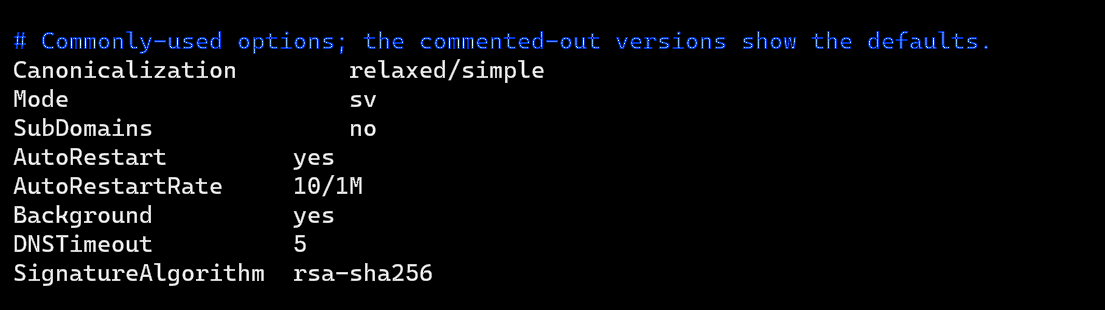
sudo vi /etc/opendkim.conf- Uncomment the following lines and replace simple with
relaxed/simple:Canonicalization simple Mode sv SubDomains no
- Uncomment the following lines and replace simple with
- Next, add the following lines below
#ADSPAction continueline. If your file doesn’t have#ADSPAction continueline, then just add them belowSubDomains no.AutoRestart yes AutoRestartRate 10/1M Background yes DNSTimeout 5 SignatureAlgorithm rsa-sha256
- Add the following lines at the end of this file if you’re on a different distro. (Note that On Ubuntu 20.04, this is already set)
#OpenDKIM user # Remember to add user postfix to group opendkim UserID opendkim - Finally append this too to the end of the file , Save and close it.
# Map domains in From addresses to keys used to sign messages
KeyTable           refile:/etc/opendkim/key.table
SigningTable       refile:/etc/opendkim/signing.table

# Hosts to ignore when verifying signatures
ExternalIgnoreList  /etc/opendkim/trusted.hosts

# A set of internal hosts whose mail should be signed
InternalHosts       /etc/opendkim/trusted.hosts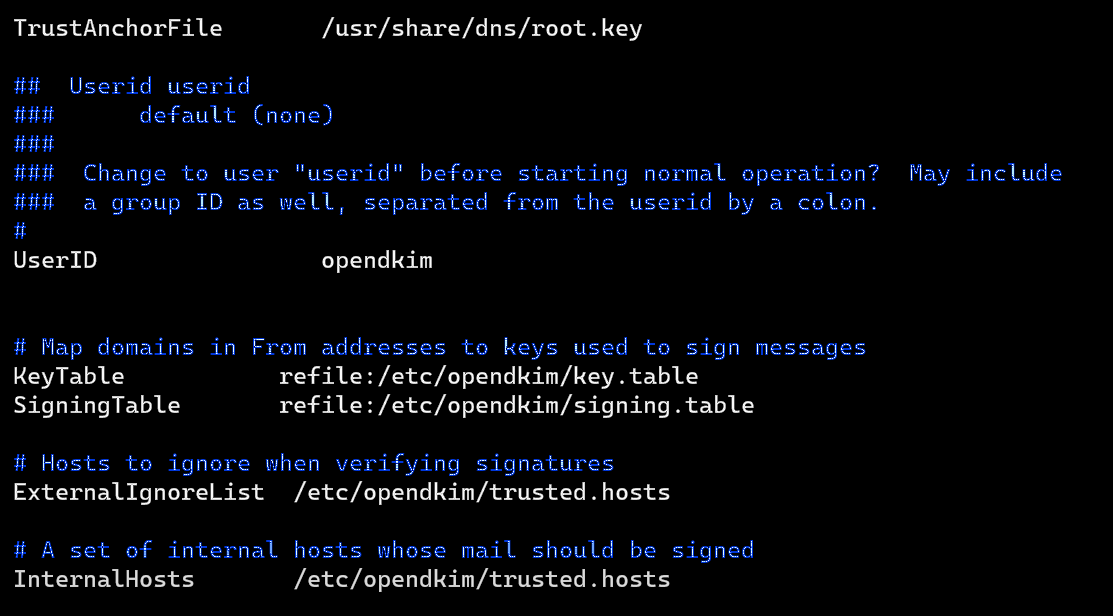
Create Signing Table, Key Table and Trusted Hosts File:
- Create a directory structure for OpenDKIM as follows:
sudo mkdir /etc/opendkim` sudo mkdir /etc/opendkim/keys - Let’s change the owner from
roottoopendkimand make sure only theopendkimuser can read and write to the keys directory.sudo chown -R opendkim:opendkim /etc/opendkim sudo chmod go-rw /etc/opendkim/keys - Now, create the signing table:
sudo vi /etc/opendkim/signing.table - Append this line. This tells OpenDKIM that if a sender on your server is using a
@example.comaddress, then it should be signed with the private key identified by default._domainkey.example.com. Replaceexample.comwith your domain:*@example.com default._domainkey.example.com

- Save and close the file. Next create the key table:
sudo vi /etc/opendkim/key.table - Append the following:
default._domainkey.example.com example.com:default:/etc/opendkim/keys/example.com/default.private - This tells the location of the private key.

- Save and close the file.
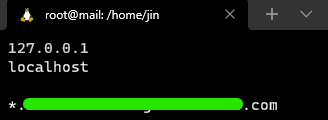
- Now, create the trusted hosts file:
sudo vi /etc/opendkim/trusted.hosts - Append the following lines to the newly created file. This tells
OpenDKIMthat if an email is coming fromlocalhostor from the same domain, thenOpenDKIMshould not perform DKIM verification on the email.127.0.0.1 localhost *.example.com - Save and close the file.
Generate Private and Public Keypairs
Since DKIM is used to sign outgoing messages and verify incoming messages, we need to generate a private key for signing and a public key for remote verification.
The Public key will be published in DNS.
- Let’s begin by creating a separate folder for the domain as follows:
sudo mkdir /etc/opendkim/keys/example.com - Now generate keys using
opendkim-genkeytool:sudo opendkim-genkey -b 2048 -d example.com -D /etc/opendkim/keys/example.com -s default -v - Make
opendkimas the owner of the private key:sudo chown opendkim:opendkim /etc/opendkim/keys/example.com/default.private
Publish Your Public Key in the DNS Records
- Grab the public key using:
sudo cat /etc/opendkim/keys/example.com/default.txt
Note: The encoded string after the
p parameteris the public key.
- Now copy everything in the between the parentheses and paste it creating a new DNS record in your domain dns config as follows:

Note: delete all double quotes and white spaces in the value field if any using some
sedmagic.
- Finally, Lets test the DKIM Key:
sudo opendkim-testkey -d example.com -s default -vvv- You will see
Key OKin the command output if all goes well until here.opendkim-testkey: using default configfile /etc/opendkim.conf opendkim-testkey: checking key 'default._domainkey.your-domain.com' opendkim-testkey: key secure opendkim-testkey: key OK
- You will see
- It may take time for your DKIM record to propagate over the Internet depending on your domain provider.
Note: If you happen to see “Key not secure” in the command output, this is because DNSSEC isn’t enabled on your domain name. DNSSEC is a security standard for secure DNS query. Most domain names haven’t enabled DNSSEC by default. There’s no need change this for now._
Connect Postfix to OpenDKIM
Postfix can talk to OpenDKIM via a Unix socket file. The default socket file used by OpenDKIM runs in a chroot jail. So we need to change the OpenDKIM Unix socket file.
- Create a directory to hold the OpenDKIM socket file and allow only the opendkim user and the postfix group to access it:
sudo mkdir /var/spool/postfix/opendkim sudo chown opendkim:postfix /var/spool/postfix/opendkim - Then edit the OpenDKIM main configuration file:
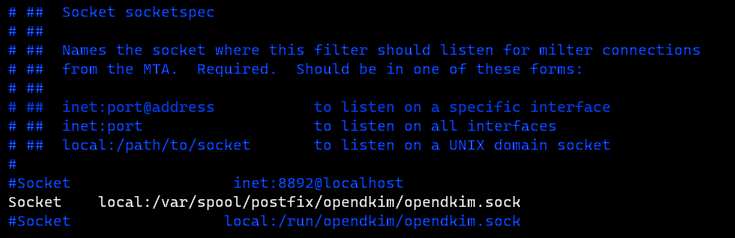
sudo vi /etc/opendkim.conf - Find the following line (Ubuntu 20.04):
Socket local:/run/opendkim/opendkim.sockorSocket local:/var/run/opendkim/opendkim.sock(for Ubuntu 18.04) - Replace it with the following line:
Socket local:/var/spool/postfix/opendkim/opendkim.sock(If you can’t find the above line, then add the following line.)
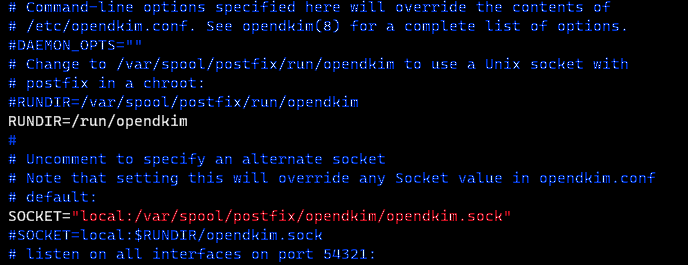
- Similarly, find the following line in the
/etc/default/opendkimfile:sudo vi /etc/default/opendkim `SOCKET="local:/var/run/opendkim/opendkim.sock"` or `SOCKET=local:$RUNDIR/opendkim.sock - Change it to:
SOCKET="local:/var/spool/postfix/opendkim/opendkim.sock"
- Save and close the file.
- Alas, we need to edit the Postfix main configuration file:
sudo vi /etc/postfix/main.cf - Append the following lines to the end of this file. Postfix will now be able to call OpenDKIM via the milter protocol.
# Milter configuration
milter_default_action = accept
milter_protocol = 6
SMTPd_milters = local:opendkim/opendkim.sock
non_SMTPd_milters = $SMTPd_milters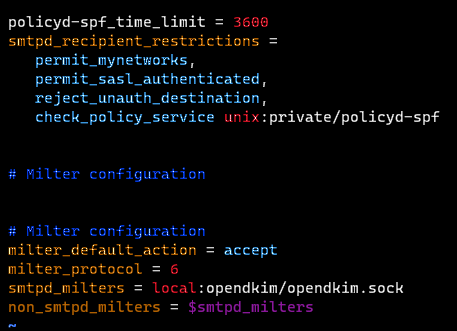
- Save and close the file. Then restart Opendkim and the Postfix service:
sudo systemctl restart opendkim postfix
Validation and checks
SPF and DKIM Check
Send a test email from thunderbird/gophish or locally to your test Gmail Account and click on the drop down as before –> show original.
Email Score and Placement
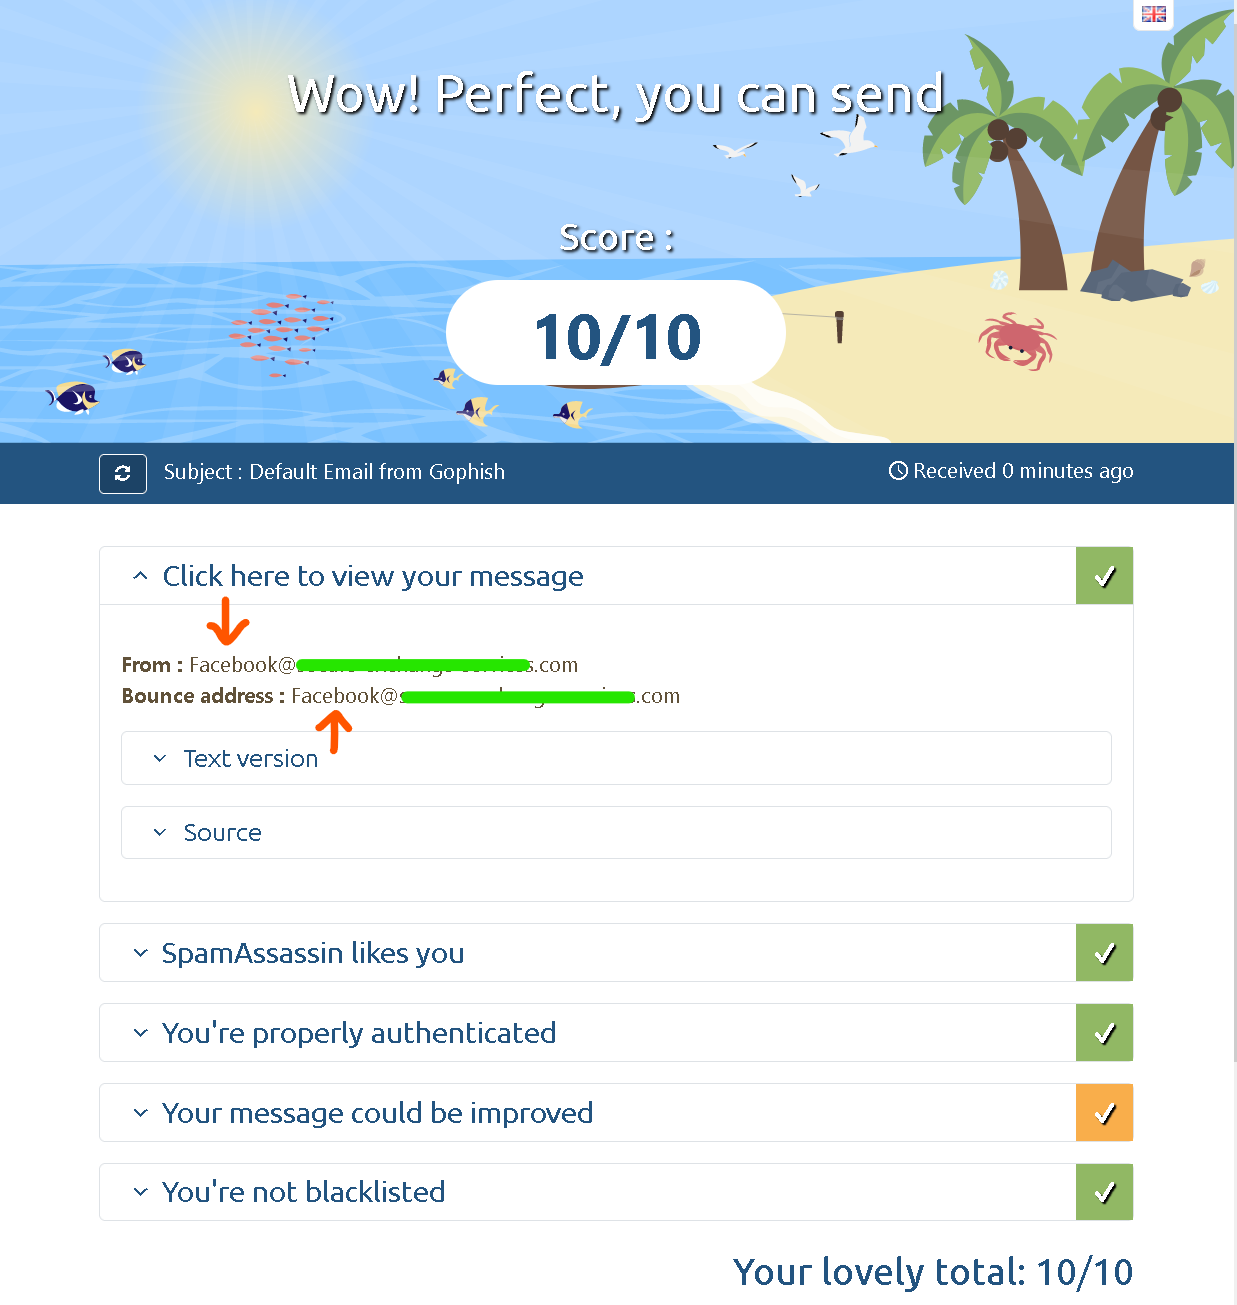
Go to https://www.mail-tester.com. You will see a unique email address. Send an email from your domain to this address and then check your score.
Primary Inbox Check: Gmail
Primary Inbox Check: Yahoo

SpamAssasin API
Go back to https://spamcheck.postmarkapp.com/ as before. Go to show original as before and click on the copy to clipboard button to call the whole message and paste it in the Check score field on the site
